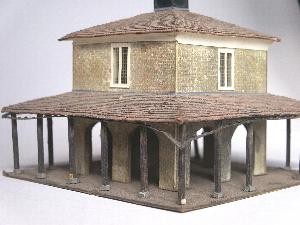
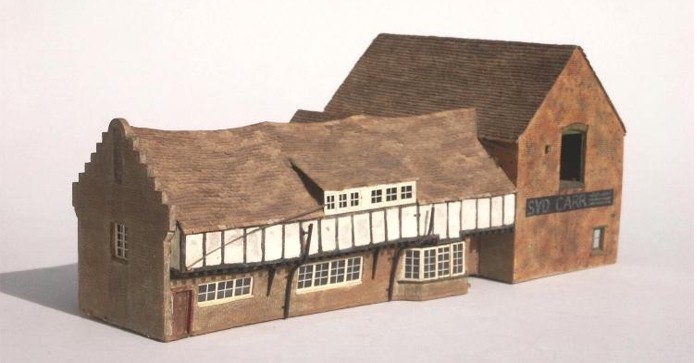
Ah!  Now here's a favourite!  It's Andy's first attempt at modelling a
real building to scale - an "all out" effort to see how good he was...

 A photo of the first PROPER model 
 building I ever attempted.  
          Click here for 7 more!

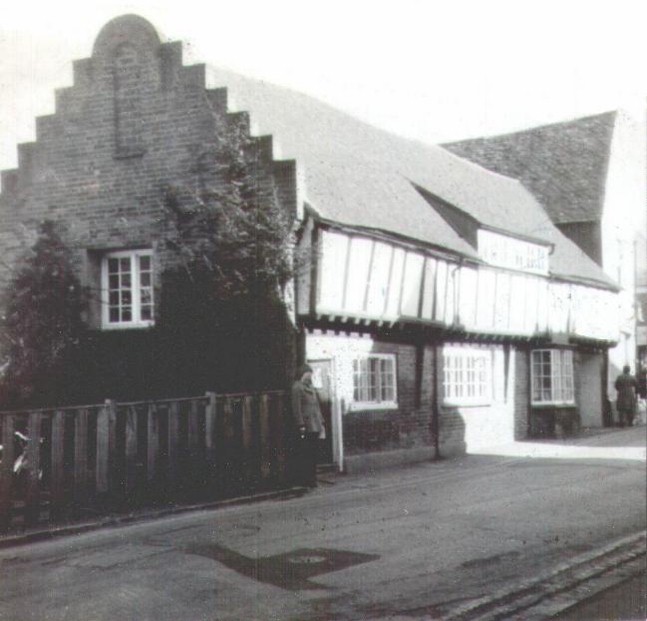
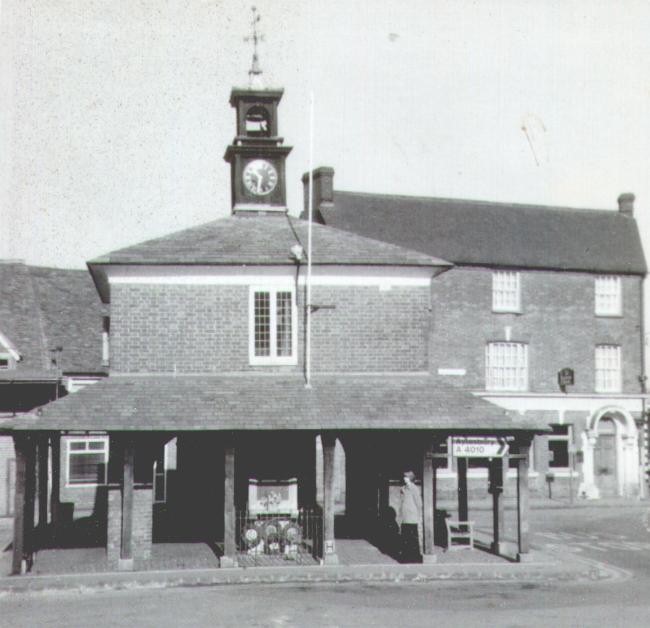
indentBelow is a photo of the original building; the Library at Princes Risborough, Bucks.  It was taken way back in the mid 1970s a few weeks before starting the model.  By 2004 the library had become a Chinese restaurant, and when I last went by it was still there but now (2016), it is a curry house! 

 Fooled you!  This is 
 the real thing! Click 
 for model photos.

indentAndy takes up the story...
indentAs a young man just married, my then wife, Jenny - a handy known-height! - stands on the corner to enable the scale to be worked out from the resulting photo.  The length was paced out - a method I still use for any building longer than a 15' tape - although I now measure doors and windows as a check that the length is generally correct. 
indent The building on the end had been "modernised" and was of no interest to me then but now, perhaps 30 years later, a shot of that would have been considered a valuable "period detail"!  However, film was expensive then and colour

far too expensive for newly-weds!  Therefore we used black and white, often developed and printed in my father's dark room using his paper!  Thanks Dad!

The methods of those days...

indentThere used to be freely available a material called "Bristol Board".  It was a card with what looked like chopped-up pig's bristles in it but it had a firm, porous surface, was less prone to warping than ordinary card and cut easily with a sharp blade.

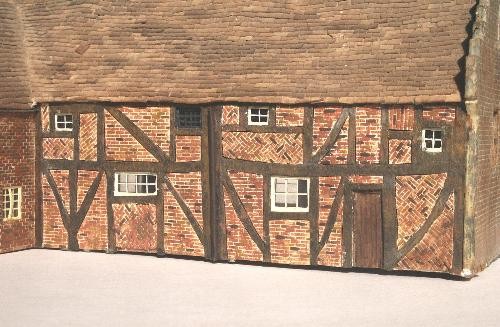
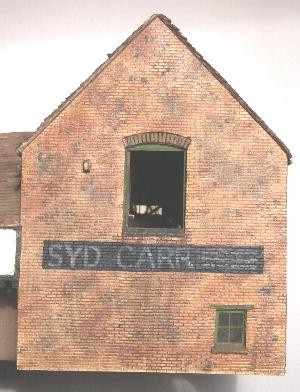
indentThe the walls at this end and under the half-timbering are made of this board.  Each wall was cut out carefully and then each brick was precisely carved into the surface by hand - row upon row first, then the pattern of alternate headers and stretchers, being careful to get the bond right where the surface changed, such as edges, windows and around the rebate in the upper gable.   Once the bricks had been painted, a thin "mortar mix" was flooded over the surface, allowed to part-dry, and then the excess rubbed off.

 An end view of Prince's 
Risboro' Library model. 
 Click here for more.
 Window detail. 
  
 And there's more...

indent    A cruel enlargement.
indentMore Bristol Board was used for the framing of the half-timbering along the front wall, which included the framing for the windows on the first floor.  (This was the reference library in those days; the reading tables being under the windows.) 
indent This was dyed black with Colron wood dye before being glued to a card backing.  The plasterwork was represented by spreading something into each aperture - but I can't for the life of me remember what it was nearly 30 years later! 

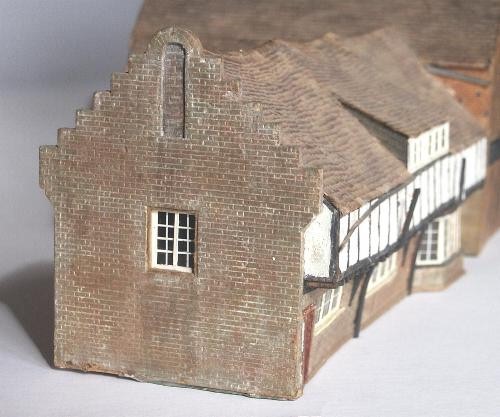
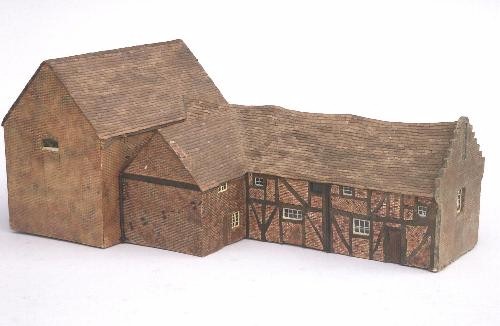
indentMy guess is that it was Pyruma, a fire-clay for use in filling cracks in fire-backs.  If "Cooked" in the oven to "cure" it it became perfectly stable.  Unfortunately, if not properly cured it soon disintegrated...

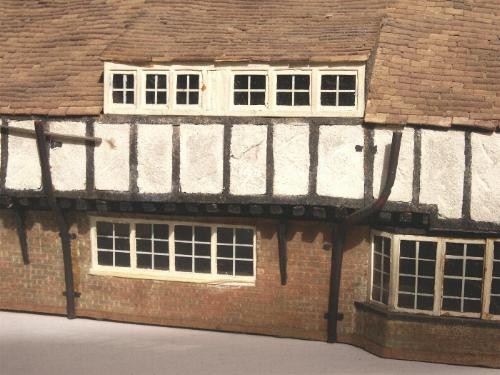
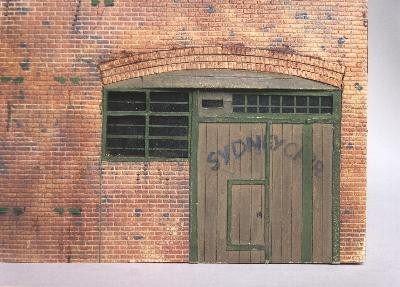
indentAs you can see from these recent photos, the Pyruma has survived beautifully.  Unfortunately, the same cannot be said for the guttering and down-pipes.  The former were thin card glued to the edge with cow-gum (I soon stopped using that method!) while the latter were bent plastic rod.   As you can see, these have straightened over the years and are in desperate need of replacement!  Nowadays I would use a suitable wire while the guttering could be produced by several methods, depending upon how visible it is and the level of detail the customer is willing to pay for!  However, considering these buildings (there's another from the same period lower down this page), are around 30 years old and have been passed around to numerous hands for close study, they have survived remarkably well.   Oh, and the windows themselves?  "Downsglaze".  It was "state of the art" in its day and much neater than furry lengths of cotton.   You could "dye" it too, with water-colour pens...

indentDoes the model have a back?  Yes!
indentThis end of the rear of the library was partly visible from an access lane down the side of the building but the rear of the shop was quite invisible, apart from an oblique view of the upper part from the other end, if I remember correctly.  At least this gave us the brick colouring! 
indent However, although the precise details of the rear of the library were not readily accessible it did make an excellent canvas to try out different methods of making brick infill; a common replacement for wattle and daub in Buckinghamshire. 

 Rear view. 
 Next!

indentThe most obvious way was to paint up part of a sheet of Slater's moulded 4mm scale brickwork and cut out bits to fit.   Of course, the real thing was quite varied, different shapes and sizes of spaces - as well as probably different hands doing the work over the years - accounted for that so some panels like this are quite correct.  However earlier, more traditionally-taught hands liked diagonal infill and that noggin-tickler's favourite, the "herringbone"!

 Is this Noggin the 
 Nod or Nodding the Nog? 
   NEXT!!!

indentI tried recreating the latter by carefully cutting out single bricks in staggered rows but somehow it didn't look right.  (See under the LH ground-floor window!)  A better effect was obtained by simply cutting the brickwork into squares and gluing those in tilted one one way, the next the other.   (See RH end, ground floor.) 

indentA brief mention of the roof is probably in order.   Yes, it did undulate like that - and I gather it still does!

indent The tiles are hand cut and individually applied much as nowadays, except that these are a bit too big really and would be cut more to scale these days.  Still, the hand-laying of individual tiles was thought of as pretty stunning stuff in its day and the smaller the tiles, the longer it took to do it!

 Now 'e's waffling  
 on about his days  
 at Pendon. Yawn- 
 Yawn. Quick- NEXT!

indentAnd so to Sydney Carr's motorcycle repair shop...
indentAs an aspiring would-be-professional modelmaker I had of course been to Pendon.   There I had not only seen the best quality modelling in the world but in fact spent many a Saturday learning some of the techniques used at first hand from the volunteer modellers who were happy to teach us "youngsters".  (Well, they were past retiring age, most of them!)  However, having found out just how long it takes to emboss the mortar lines into card and then paint individual bricks I was well aware that it would have been prohibitively expensive to adopt that method for all but the very richest customers - and it still is for most!  (Pendon modellers often spend between one and three thousand hours on each cottage - multiply that even by £10 an hour and you can see what I mean!)
indent I had also learnt how long it takes to carve brickwork into the card with a scalpel, although at least the mortar lines are easier to paint.

indentI therefore felt it was worth trying to find a way of using embossed plasticard, especially for the larger areas involved here!  After some experimentation the best way seemed to be to first paint the plasticard with stipples of mixed Humbrol paints (the only enamels freely available at the time), leave them to harden and then add a wash of thinned Humbrol as mortar.  You can see the results here, and in detail, below.
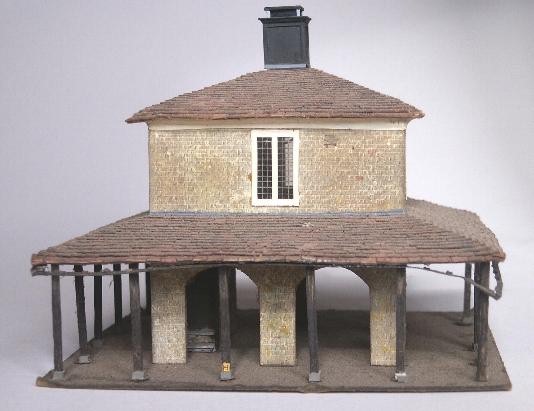
 'Doesn't he know that  
 Sid is spelt with an 'I'?'

 'Yes, but that would 
 spoil the joke.'

 'Joke; what joke?' 

 'Next!'

indent   Syd Carr's repair shop doors.
indentApart from cutting a vertical strip of brickwork into ½brick-width slices and then curving three layers over the opening as an arch, the rest of Syd's doorway was a simple exercise in card taken from a nearby prototype.  Nowadays I would make the separate infill brickwork beside the new(ish) doors from sheet painted a different colour since it would be of a different period and therefore almost certainly a different brick.
indentMy painting of names has also improved a tad since this early work - as it should have after nearly 30 years!  Well, so much for the Library.

The Market Building, Princes Risborough.
Another model of a real building, made at the same time using similar methods.

 The first of 3 photos of a 
 model market building. 
    Click for one of the 
 real thing...

indentThis was the second model I attempted and is the only other one I retain from those pre-professional days.
indentThe walls were made from the same material, carved and painted in the same way as the Library.  As you can see, the guttering here too has failed over the last 30 years - but then again it has been handled rather more than was good for it and bashed about in moving house as you can see from the roof corners.  Still; nothing that can't be repaired should I ever find a home for it.  If all my models last this well I shall be a contented man!

indentBelow is the prototype; the Market Building at Princes Risborough, Bucks. The photo was taken on the same day as the one of the Library.  I don't suppose a proper market has been held under this roof for centuries - but maybe you know better! Sorry these original photos are black and white; maybe I'll get back to Bucks one day and take some more.

indentI found this market building a delightful subject.  I suppose at the time I had visions of a model of the Great Central - ą la Peter Denny - but that never happened.  What did get built was an interesting but rather unrealistic model called "Vale Edge".  It was never finished and neither did it feature these buildings - but that's another story!

indentThe bell tower with its clock and weathervane never did get finished; I never bought the "Scalelink" weathervane and clock faces I had intended for it - and now I've lost the upper portion completely!   It'll turn up one day I suppose.  I hope.

 The real market building. 
 Click for more of 
 the model...
 Second of 3... Blimey! 
 You still here? 
 Oh well done!
 Nearly done!

A ¾ view of the finished model market building.

(This and all photographs copyright
Andy McMillan unless credited.
Dates vary.)

indentI made a classic beginner's mistake with this model! 
I used a single photo and some detail sketches of the stairs to the office above - after all, it was the same on all sides, wasn't it?  Simple.
indentMany years after completing the model I was back in the area visiting my late father when I passed through Prince's Risborough - and was horrified to find that the building only had the lower roof on three sides!  Of course, it may have had all four when it was built - a close scrutiny of the surviving brickwork should make that clear - but it certainly doesn't now so neither should the model!  Perhaps it was removed to allow vehicles to pass on that side; there wouldn't be room for even an equestrian were it present!  Or am I clutching at straws?  Still. Goes to show you should at least walk all around your prototype if you can, doesn't it!

indentI learned one other thing on from making this model; an excellent way of making small leaded lights, as featured right, in this close-up.  First I drew up the windows and scored the bars deeply but without cutting through.   Then I flooded the grooves with a medium grey enamel and left that to dry for a few minutes before wiping off.  If you got it right the glazing would return to being clear but most of the paint would stay in the scores, thus giving the right effect.  Another benefit of scoring - as opposed to just painting in very fine lines - is that the plastic bends slightly next to each cut.

 Last Market Building 
 photo. Only click here 
 when you want to move 
 on to the next page!

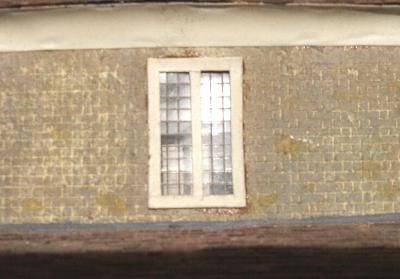
indentNormally this can spoil the "flat" look one wants from modelled glass but in this case, with such small panes and with so many cuts, the glazing crinkles slightly so that each individual pane ends up leaning in a slightly different direction which gives off much more realistic reflections, as you can see for yourselves!  Another of the myriad realistic details we've learned over all these years! (Well, that's what we keep telling ourselves, anyway!)

indentAnd that's it for this page, except to mention in passing that COUNTRYSIDE MODELS do not normally accept orders for single model buildings - on the other hand you can always ask...  (After all, we did recently do a gasworks!)